Both Kotlin and the KubeRig DSL are typesafe. Therefor we need deep type information about CRDs
otherwise we can't generate the KubeRig DSL for them. This is a major challenge due to a number of reasons:
CRD definitions are flattened. Deep type information is lost.
CRD definitions can be defined with the x-kubernetes-preserve-unknown-fields:
true flag which means we don't have any type information available.
After realizing the needed data was not available I was a bit down. But soon realized I needed to dig deeper at the problem.
After trying a couple of things that did not work out at all. I found the controller-tools repository!
It contains tools to build controllers. Controllers are background processes that make your own CRDs come to life
and actually implement the functionality behind them.
The controller-tools CLI has a command which generates
the CRD definitions based on markers in GO-code. Perfect, here we have all the type information we need, to generate the API specification needed.
I've never done any development in GO but that was not going to stop me.
Down the controller-tools rabbit hole I went!
The Solution
In my fork of the controller-tools repo I added a swagger command.
The swagger command generates the API specification for a CRD group preserving all the type information.
It reuses the same markers as the CRD command so there is no additional burdon on CRD creators.
I've been developing this by trying it out on a fork of the Tekton pipeline code base.
I did need to add a marker here and there to get it working to Tekton, but I thought it was the perfect candidate
to try it on since it uses the x-kubernetes-preserve-unknown-fields flag extensively.
After a couple of months working in the evening and really early morning hours. Digging in the controller-tools GO code.
Figuring out how it works. Learning how to do things in GO. Having to Google every simple thing you can imagine.
Like how to do a loop and stuff and in the meantime trying to get something that works.
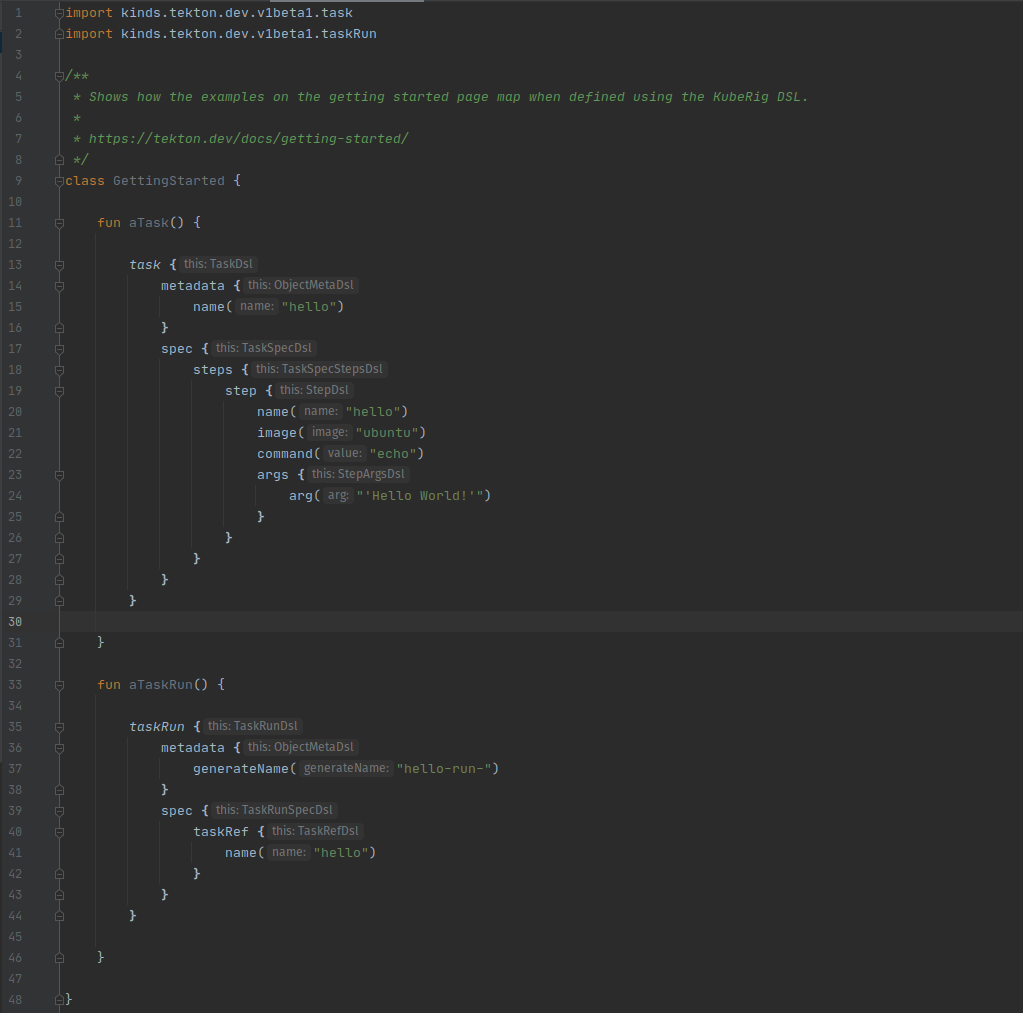
Something emerged that allowed me to generate the KubeRig DSL for Tekton pipelines!
You can find the default installed API and the generated API specifications here.
The Result
With a KubeRig DSL generator project set up. We can start to consume the KubeRig DSL.
And it looks like this...
The KubeRig DSL generator project can be found here,
and the example code here.
Wrapping up
Really happy with this milestone!
Really learned a lot and done my first GO development on the way.
I can hardly imagine what is possible with being able to really code Tektoncd pipelines like this. Something to find out!
I'll be adding more CRD DSLs to the kuberig-crd-dsl repository
in the future and make it easy to consume them with KubeRig.
If you are missing your favorite CRDs in the kuberig-crd-dsl repository let me know!
It took some time to figure out how to setup the CircleCI pipelines for the KubeRig repositories so I am sharing details on the setup here as it may help others figure it out faster.
Context
KubeRig is made up of a couple of related repositories.
kuberig-dsl is the gradle plugin that can generate the kuberig DSL from a kubernetes or openshift swagger api specification file.
kuberig-dsl-vanilla-plugin is the grade plugin to generate the kuberig DSL for vanilla kubernetes and openshift versions.
kuberig-dsl-kubernetes uses the kuberig-dsl-vanilla-plugin to generate the kuberig-dsl for upstream kubernetes versions.
kuberig-dsl-openshift uses the kuberig-dsl-vanilla-plugin to generate the kuberig-dsl for upstream openshift versions.
kuberig is the gradle plugin that makes it easy to deploy resources defined using the kuberig DSL.
Versioning
I don't like to have a version specified in the gradle.properties file. I like it to be determined either by the git tag or by the git branch name + the CI build number.
It took some time before I figured out how to get this done with CircleCI. I ended up using a CircleCI command with a version parameter. The parameter value contains the environment variables to use to construct the actual version value. As each step is executed in a separate shell the value of the version parameter is used to set a VERSION environment variable that is passed to the gradle build with the -Pversion command line argument. -P is used to pass in Gradle project properties .
The correct value of the parameter is defined in 2 different job definitions a build job that uses the branch name and build number and a release job that uses the git tag.
Setting up the version based on Git tag or Git branch is used in the kuberig-dsl, kuberig-dsl-vanilla-plugin and the kuberig repositories.
The kuberig-dsl-kubernetes and kuberig-dsl-openshift follow the version number of the kuberig-dsl repository. They have the version of the kuberig-dsl they are currently generating with defined in the gradle build properties.
Automatic version updates
The kuberig-dsl-kubernetes and kuberig-dsl-openshift repositories follow 2 upstream version streams:
kubernetes and openshift versions
kuberig-dsl versions
kubernetes or openshift versions: When new upstream versions are released I want them to be added automatically. For every upstream version a new sub project is added by custom tasks in the kuberig-dsl-vanilla-plugin. This is done by scheduling the job every hour.
The changes made by the pipeline are committed back to the repository.
The missing versions are also published to jcenter (still one manual action needed every time a new version is released to have it included).
kuberig-dsl versions: When a new kuberig DSL version is released all the DSLs for the upstream versions need to regenerate and publish.
This is done by the release pipeline of the kuberig-dsl repository. It commits on the kuberig-dsl-kubernetes and kuberig-dsl-openshift repositories. The commit is done with the [skip ci] flag as the downstream pipelines run every hour.
Git Commit & Push
There are 2 places where KubeRig pipelines commit changes.
When there are new upstream versions of either Kubernetes or OpenShift.
When there is a new version of kuberig-dsl.
In order to be able to commit from the pipeline you need to setup deploy keys that have write permission on the repository. Each repository requires a different deploy key, you can't reuse them on GitHub.
The private keys are added to the CircleCI projects for host github.com.
In the pipelines you need to add the ssh keys using the fingerprint shown on the SSH keys page in CircleCI using the add_ssh_keys step.
Publishing
Everything publishs to rigeldev-oss-maven on bintray. For the dependencies that are needed by users I also click the 'include on jcenter' button so there is no need to add the rigeldev-oss-maven repository.
The kuberig-dsl and kuberig repositories also publish to the gradle plugin portal.
The kuberig-dsl-vanilla-plugin is not published to the gradle plugin portal as it is an internal plugin not used by kuberig users.
Possible improvements
This is already a nice setup that removes a lot of manual work from my plate but we can always do better.
Some improvements I am considering:
Have the kuberig-dsl-vanilla-plugin also generate the CircleCI config.yml file to build all upstream version specific sub projects in parallel.
Have the kuberig-dsl-vanilla-plugin send Slack notification when jcenter inclusion requests need to be made for new versions.
Calculate better cache checksums as described here.
Spin up kind k8s clusters for integration testing.
So this happened 2 days ago, @learnk8s tweeted about Kuberig! I could almost not believe it, I had to look twice!
If you prefer an alternative to writing YAML, you should check out KubeRig — an open-source deployment automation tool that uses a DSL written in Kotlin to define Kubernetes resourceshttps://t.co/zm3oePbOHupic.twitter.com/jbkiHWFU7h
What makes defining ConfigMaps with KubeRig so easy is mainly because of the environment support.
Via the ResourceGeneratorContext you have access to:
The current environment via environment().
Environment specific configuration values via environmentConfig(configName) read from the environments/{environment-name}/{environment-name}-config.properties file.
Environment specific files via environmentFileText(filePath) and environmentFileBytes(filePath); filePath is used within the environment directory environments/{environment-name}.
Via """...""".trimIndent() available in Kotlin. You have a simple way of creating a template for files that contain a lot of configuration values.
What is next?
Now that you know how to access environment specific files and values we can show you how to work with sensitive information and generate Secrets in a next post.
From KubeRig version 0.0.30 on the initEnvironment task also supports Amazon Elastic Kubernetes Service (EKS).
KubeRig project setup
In case you want to jump right in you can download or clone the kuberig-starter repository.
In case KubeRig is new for you or you want to know the details about the project setup. Please read this first.
Create an EKS cluster
Having never used any AWS service (I know what planet am I from, right). Trying to use the EKS service from Amazon was a real pain. It was a total suprise to experience how difficult it was.
After inspecting the aws command line and the options needed (subnet-ids,security-group-id,role-arn) I gave up trying to use it directly. Because I remembered this tweet from Weaveworks about the eksctl command line tool. Thank god they made this command line tool!
In addition to eksctl you will also need aws-iam-authenticator installed otherwise you will get an warning and kubectl will not be able to authenticate to the cluster.
Now we can just execute this simple command.
eksctl create cluster
After a couple of minutes the cluster is up and running and your kubectl context will be updated to the newly created cluster.
Initialize the KubeRig environment
We can now use the initEnvironment task to initialize a KubeRig environment based on the kubectl config for EKS clusters.
With the following command we create an environment called dev based on the current kubectl context.
$./gradlew initEnvironment --currentKubectlContext --name dev
The --currentKubectlContext flag is key.
For details about the initEnvironment task please visit the initEnvironment task page.
After the command completes you can start coding resources and execute the deployDevEnvironment task to deploy them.
Limitations
The --currentKubectlContext flag of the initEnvironment task is still brand new (available from KubeRig version 0.0.27).
For limitations about the initEnvironment task please visit the initEnvironment task page.
In case you run into problems please create an issue on github or jump in and create a pull-request.
What is next?
Now that the most important providers are supported by the initEnvironment task. I'll be focusing on adding new features.
The initEnvironment task is intented to make it easy to configure a KubeRig environment and start deploying resources to an existing Kubernetes Cluster.
The initEnvironment task will make sure that:
The environment directory (environments/$environment.name$) is created
The environment configs file ($environment.name$-configs.properties) is created inside the environment directory.
The api server url is added to the environment configs file as an encrypted value.
The environment encryption key ($environment-name$.keyset.json) is generated inside the environment directory.
Everything except for the environment encryption key are safe to commit.
I advise you to create a secure backup of your environment encryption key.
Flags
--name
The name to use for the new environment.
--apiServerUrl
Mostly only usable for local development environments without authentication/authorization like microk8s.
No service account is created when using this flag.
--currentKubectlContext
When using the --currentKubectlContext flag there is no need to specify the --apiServerUrl flag because all details will be read from the kubectl config file.
The --currentKubectlContext flag triggers the initEnvironment to use the current Kubectl context to create the kuberig service account.
The kuberig service account is created in the namespace of the Kubectl context. In case no namespace is set the default namespace is used.
A kuberig-edit rolebinding is created granting ClusterRole edit to the kuberig service account.
The access token for the kuberig service acount is added to the environment and encrypted (see environments/$environment.name$/.encrypted.$environment.name$.access-token)
Limitations
The Kubectl configuration file has a lot of possible ways to configure access to a Kubernetes cluster and it will take more work to make the --currentKubectlContext deal with them all.
Currently it is known to work for:
Digital Ocean Kubernetes service
Google Kubernetes Engine
minikube
In case you run into problems please create an issue on github or jump in and create a pull-request.
Task Help
With Gradle it easy to get some more information about a task. So always remember that help is only a single command away.
If you run help --task initEnvironment you get details about what arguments the task takes with additional information about them.
$ ./gradlew help --task initEnvironment

> Task :help
Detailed task information for initEnvironment

Path
     :initEnvironment

Type
     InitEnvironmentTask (io.kuberig.gradle.tasks.InitEnvironmentTask)

Options
     --apiServerUrl     The URL of the api server of your cluster

     --currentKubectlContext     From the current kubectl context

     --name     The name of the environment that you want to create

Description
     -

Group
     kuberig

BUILD SUCCESSFUL in 0s
1 actionable task: 1 executed
After a couple of minutes the cluster is up and running and your kubectl context will be updated to the newly created cluster.
Initialize the KubeRig environment
As was already possible for DOKS clusters. We can now use the initEnvironment task to initialize a KubeRig environment based on the kubectl config for GKE clusters.
With the following command we create an environment called dev based on the current kubectl context.
$./gradlew initEnvironment --currentKubectlContext --name dev
The --currentKubectlContext flag is key.
For details about the initEnvironment task please visit the initEnvironment task page.
After the command completes you can start coding resources and execute the deployDevEnvironment task to deploy them.
Limitations
The --currentKubectlContext flag of the initEnvironment task is still brand new (available from KubeRig version 0.0.27).
For limitations about the initEnvironment task please visit the initEnvironment task page.
In case you run into problems please create an issue on github or jump in and create a pull-request.
What is next?
A post about how KubeRig supports safe handling of secrets is long overdue.
After this command completes your kubectl context is updated to the newly created cluster.
Initialize the KubeRig environment
We can use the initEnvironment task to initialize the KubeRig environment.
With the following command we create an environment called dev based on the current Kubectl context.
$ ./gradlew initEnvironment --currentKubectlContext --name dev
The new --currentKubectlContext flag is key.
For details about what the task does when using the --currentKubectlContext flag please visit the initEnvironment task page.
The environment is now ready for use.
Start coding resources and execute the deployDevEnvironment task to deploy them.
Limitations
The --currentKubectlContext flag of the initEnvironment task is brand new (available from KubeRig version 0.0.27).
It is currently only known to work for Digital Ocean Kubernetes clusters created with the doctl command line.
The Kubectl configuration file has a lot of possible ways to configure access to a Kubernetes cluster and it will take more work to make the --currentKubectlContext deal with them all.
In case you run into problems please create an issue on github or jump in and create a pull-request.
What is next?
Make the --currentKubectlContext work for GKE is next on my todo.
After setting up your local development environment you may be wondering. Now what?
KubeRig works by scanning your Kotlin code for annotations. Methods that have the @EnvResource annotation will be used to generate a resource.
The @EnvFilter annotation that allows you to define resources that are only needed in specific environments.
When using the @Tick annotation KubeRig will perform staged deployments. This allows you to gradually allow traffic to your new deployment.
Besides the annotations there is the Kotlin DSL that needs to be used to define your resources. We will dive a little deeper on the Kotlin DSL later.
First a little more detail on the annotations.
Annotation Details
@EnvResource
You place the @EnvResource annotation on public methods. The methods need to return a DSL type. This comes down to taking the name of the Kind and adding the suffix 'Dsl'. So ConfigMap becomes ConfigMapDsl for the DSL type.
Inside the function you can use factory methods that match the kind name. These factory methods take a function to configure the DSL type.
For example:
package example

import io.kuberig.annotations.EnvResource
import kinds.v1.ConfigMapDsl
import kinds.v1.configMap

class FirstResource {

    @EnvResource
    fun firstResource() : ConfigMapDsl {
        return configMap {
            metadata {
                name("first-resource")
            }
            data("some-key", "some-value")
        }
    }

}
@EnvFilter
You place the @EnvFilter annotation on a method that is already annotated with the @EnvResource annotation.
In the environments parameter of the annotation you specify the names of the environments this resource should be applied to.
This example shows how to apply a resource only to the 'dev' and 'test' environments.
I am using this to run a database inside the 'dev' and 'test' environments. The other environments have dedicated external databases.
@Tick
You place the @Tick annotation on a method that is already annotated with the @EnvResource annotation.
In the tick parameter of the annotation you specify which stage this resource should be applied for.
For example:
@EnvResource
@Tick(10)
fun firstResource() : ConfigMapDsl { ... }
This example show how to have a resource applied for stage 10.
More details on staged deployments will follow in a dedicated post.
Annotation Limitations
At present the annotation scanning only works for code inside your kotlin source directory. Annotations placed on classes of dependencies are not detected. Also annotations on parent types are not detected yet.
This is a limitation that will be removed in one of the next versions of KubeRig.
DSL Details
The @EnvResource annotations require you to return a DSL type.
All DSL types can be found in the 'kinds' package. Sub-packages of the 'kinds' package follow the Kubernetes group structure.
All DSL types are the kind name + 'DSL'.
All DSL types have a factory method named after the kind. These methods also reside in the 'kinds' package and sub-packages.
The DSL follows the YAML file structure you are used to. With one small enhancement to lower the amount of levels.
For containers that have singular name like 'data' in ConfigMaps the DSL provides a shortcut. The name of the container provides direct access to add the container elements.
Without this the ConfigMap DSL usage would look like this:
@EnvResource
fun firstResource() : ConfigMapDsl {
    return configMap {
        metadata {
            name("first-resource")
        }
        data { // this level is skipped
            data("some-key", "some-value")
        }
    }
}
You will notice that there are no properties available on the DSL types. This is intentional. All DSL usage is method based to have a consistent look.
All DSL types are open so you can add your own extension methods.
My personal favorite at the moment is an extension function to specify resource requests/limits. The function itself is not sexy but the usage is.
More annotations to limit the amount of DSL code that needs to be used.
I am thinking of adding parameters for the name and the namespace of the resource to the @EnvResource annotation. Adding an @EnvNamespace annotation that can be placed on packages to limit a lot of repetition.
I am also playing with the idea of adding an @EnvConfigCheck annotation. That can be used to validate configuration before performing a deploy. This would be perfect for e.g. validating credentials are valid. In case you are not in Vault dynamic credentials land off course.
Beyond annotations
I am also working on DSL pre/post-processors. This will provide a powerful mechanism to enhance DSL types and validate the generated resources.
I am thinking of things like, configuring all Spring-Boot applications in a consistent way so they expose prometheus metrics in the same way. Without bothering the applications developers with it.
Today I am going to show you how easy it is to get started with KubeRig and microk8s.
KubeRig is a tool to deploy to Kubernetes, you define the resources in real code by using a Kotlin DSL.
Microk8s is a very easy to use local Kubernetes distribution.
Prerequisites
You need to have a Java JDK installed. This examples uses OpenJDK 12.0.1.
You need to have Gradle installed. This example uses Gradle 5.4.1.
You need to have Git installed. This examples uses Git 2.20.1.
You need to have microk8s installed. This example uses microk8s v1.14.1
I am performing these steps on an Ubuntu 19.04.
Initial project setup
KubeRig is a Gradle plugin. So we need to create a new Gradle project.
Create a new project directory and enter it (I am using kuberig-microk8s-example).
This creates an empty Gradle project. In order to verify that our setup was successful lets use the Gradle wrapper to check what tasks are available. In case this is the first time you run a Gradle wrapper configured for Gradle version 5.4.1 you will see it being downloaded.
> ./gradlew tasks
Task :tasks
------------------------------------------------------------
Tasks runnable from root project
------------------------------------------------------------Build Setup tasks
-----------------...
Help tasks
----------...
To see all tasks and more detail, run gradlew tasks --all
To see more detail about a task, run gradlew help --task <task>
BUILD SUCCESSFUL in 4s
1 actionable task: 1 executed
Now is a good time to initialize Git and make our first commit.
The git add --all will give a warning about CRLF. I am not going to bother with this in this post.
Add KubeRig
Now that we have an empty Gradle project we can add the KubeRig plugin.
Visit the Gradle Plugin Portal to check for the latest version.
Add the following to your build.gradle.kts file.
plugins {
id("io.kuberig.kuberig") version "0.0.44"// TODO use latest version
}
repositories {
jcenter()
}
In order for Gradle to be able to download KubeRig and other dependencies it needs to know where it should download them from. We specify that Gradle should use jcenter in the repositories section.
In the plugins section we specify that we want to add the KubeRig plugin and what version of it. Please check the Gradle plugin portal for the latest version and use that one.
Now that the KubeRig plugin is added to the project we can define our first environment.
This can be done by using the initEnvironment task. With Gradle it easy to find out what the task needs by using the help command.
> ./gradlew help --task initEnvironment

Task :help
Detailed task information for initEnvironment

Path
     :initEnvironment

Type
     InitEnvironmentTask (io.kuberig.gradle.tasks.InitEnvironmentTask)

Options
     --apiServerUrl     The URL of the api server of your cluster

     --environmentName     The name of the environment that you want to create

Description
     -

Group
     kuberig

BUILD SUCCESSFUL in 0s
1 actionable task: 1 executed
This will make a bunch of tasks become available for the local environment.
> ./gradlew tasks --group kuberig
Task :tasks
------------------------------------------------------------
Tasks runnable from root project
------------------------------------------------------------Kuberig tasks
-------------
createEncryptionKeyLocalEnvironment
decryptConfigLocalEnvironment
decryptFileLocalEnvironment
decryptLocalEnvironment
deployLocalEnvironment
encryptConfigLocalEnvironment
encryptFileLocalEnvironment
encryptLocalEnvironment
generateYamlLocalEnvironment
initEnvironment
initGitIgnore
To see all tasks and more detail, run gradlew tasks --all
To see more detail about a task, run gradlew help --task <task>
BUILD SUCCESSFUL in 5s
1 actionable task: 1 executed
By annotating the firstResource method with @EnvResource KubeRig will detect it.
Kubernetes resources are available inside the kinds package of the KubeRig DSL. Inside this package they follow the Kubernetes groups structure for packages.
In this example we are defining a simple ConfigMap resource. The structure is almost 1-on-1 with the structure of the YAML files. More on this topic will be covered in more detail in future posts.
We are now ready to deploy our first resource. Run deployLocalEnvironment.
> ./gradlew deployLocalEnvironment

> Task :deployLocalEnvironment
created ConfigMap - first-resource in default namespace

BUILD SUCCESSFUL in 3s
4 actionable tasks: 3 executed, 1 up-to-date
Congrats you have just deployed your first resource with KubeRig!